RJSFを使ってkintoneプラグインの設定画面を作成してみた
react-jsonschema-form(RJSF)とは
JSON Shemaからフォームを自動生成するReactのライブラリです。
https://rjsf-team.github.io/react-jsonschema-form/
JSON Schemaとは
JSONの構造を定義する記法です。
なぜプラグインの設定画面をRJSFで作るのか
設定画面の目的は何でしょうか?あたりまえですがそれはdesktop.jsで使う情報を設定できるようにすることです。
例えば他のアプリのレコードを更新するプラグインの場合は、以下のような値を設定したいです。
- 更新先のアプリID
- 更新するフィールドコード
- 更新する値
そしてこれらの値はソースコードにハードコーディングせず、設定画面で変更したい動機があってプラグイン化しています。
前置きが長くなりましたが、設定画面とはkintone.plugin.app.setConfig(config, successCallback)のconfig(JSON)を作成するためのフォームです。
つまり、開発者はdesktop.jsでどういう設定情報を使いたいか、その設定情報のJSON Schemaを定義するだけであとはRJSFが勝手にフォームを作成してくれるのです。
これはプラグインの開発コストの削減に期待できます。
設定画面を開発したことがある人はわかると思うのですが、フォームを作成するってすごく大変なんですよ。
例えば
- 設定する値に対するinputのタイプを考える
- JSONの入れ子構造に合わせてフォームの入れ子構造を作成する
- 設定する値が配列の場合に、増減ボタンをつけて動作を実装する
などなど。特に最後の配列の増減の動作については、途中の要素を削除したり増やしたり、順番を入れ替えたりなどを実装するのは結構骨が折れます。まあ、こういうのを実装するのが楽しい所ってのはあったりしますが、JSON Shemaからフォームが自動生成されるならばそっちに任せてdesktop.jsの実装など他のことに時間を使ったほうがプロダクトの付加価値が増えますよね。
RJSFで設定画面を作成する
実際に作成した自作のプラグインです。Mermaid記法から図を生成するプラグインです。
https://github.com/okayus/mermaid-on-kintone
以下の手順で作成していきました。
※前提条件としてwebpack-plugin-kintone-pluginで初期の環境構築が済んでいることとします。
1. 環境構築
以下で必要なライブラリをインストールします。
# devDependenciesのインストール
npm install --save-dev @babel/core @babel/plugin-transform-runtime @babel/preset-env @babel/preset-react @babel/preset-typescript @kintone/create-plugin @kintone/dts-gen @types/node @types/react @types/react-dom babel-loader css-loader eslint-import-resolver-typescript eslint-plugin-import npm-watch prettier style-loader tsconfig-paths-webpack-plugin typescript webpack-merge

# dependenciesのインストール
npm install @emotion/react @emotion/styled @kintone/rest-api-client @mui/icons-material @mui/material @rjsf/core @rjsf/mui @rjsf/utils @rjsf/validator-ajv8 react react-dom
うまく行かない場合は上記で公開しているリポジトリのpackage.jsonを参考にしてください。
2. Reactで簡易プラグインを作成し、ビルドする
Reactでプラグインを作成し、ビルドするためのファイルを用意します。
module.exports = {
  extends: ["@cybozu/eslint-config/presets/react-typescript-prettier"],
  plugins: ["import"],
  settings: {
    "import/resolver": {
      typescript: true,
      node: true,
    },
    "import/extensions": [".js", ".ts", ".jsx", ".tsx"],
  },
  rules: {
    "sort-imports": [
      "error",
      { ignoreCase: true, ignoreDeclarationSort: true },
    ],
    "import/order": [
      "error",
      {
        groups: [
          "builtin",
          "external",
          "internal",
          "parent",
          "sibling",
          "index",
          "object",
          "type",
        ],
        pathGroups: [
          {
            pattern:
              "{react,react-dom/**,react-redux/**,react-redux, styled-components}",
            group: "builtin",
            position: "before",
          },

          {
            pattern: "@desktop/**",
            group: "external",
            position: "after",
          },
          {
            pattern: "@assets/**",
            group: "external",
            position: "after",
          },
        ],
        pathGroupsExcludedImportTypes: ["builtin"],
        alphabetize: {
          order: "asc",
          caseInsensitive: true,
        },
        "newlines-between": "always",
      },
    ],
  },
};{
"compilerOptions": {
"target": "es5",
"module": "es2015",
"jsx": "react",
"strict": true,
"skipLibCheck": true,
"resolveJsonModule": true,
"moduleResolution": "node",
"allowSyntheticDefaultImports": true,
"allowUnusedLabels": false,
"allowUnreachableCode": false,
"exactOptionalPropertyTypes": true,
"noFallthroughCasesInSwitch": true,
"noImplicitOverride": true,
"noUnusedLocals": true,
"noUnusedParameters": true,
"verbatimModuleSyntax": true,
"checkJs": true,
"forceConsistentCasingInFileNames": true,
"esModuleInterop": true,
"baseUrl": ".",
"types": [
"@types/node",
"@kintone/dts-gen/kintone.d.ts",
"./types/fields.d.ts",
],
"paths": {
"@desktop/*": ["./src/ts/desktop/*"],
"@config/*": ["./src/ts/config/*"],
"@assets/*": ["./assets/*"]
}
},
"include": ["./src/ts/**/*.ts", "./src/ts/**/*.tsx"],
"exclude": ["dist", "node_modules"]
}/* eslint-disable no-undef */
const path = require("path");
const TerserPlugin = require("terser-webpack-plugin");
const KintonePlugin = require("@kintone/webpack-plugin-kintone-plugin");
const TsconfigPathsPlugin = require("tsconfig-paths-webpack-plugin");
const packageJson = require("./package.json");
const pluginName = packageJson.name;
// https://webpack.js.org/configuration/mode/#mode-none
module.exports = (env, arg) => {
return {
entry: {
desktop: "./src/ts/desktop/index.tsx",
config: "./src/ts/config/config.tsx",
},
output: {
path: path.resolve(__dirname, "plugin", "js"),
filename: `${pluginName}-[name].js`,
},
plugins: [
new KintonePlugin({
manifestJSONPath: "./plugin/manifest.json",
privateKeyPath: "./private.ppk",
pluginZipPath: "./dist/plugin.zip",
}),
],
target: ["web", "es6"],
module: {
rules: [
{
test: /\.tsx?$/,
use: [
{
loader: "babel-loader",
options: {
presets: [
"@babel/preset-env",
"@babel/preset-react",
"@babel/preset-typescript",
],
plugins: ["@babel/plugin-transform-runtime"],
cacheDirectory: true,
},
},
],
exclude: /node_modules/,
},
{
test: /\.css$/,
use: ["style-loader", "css-loader"],
},
],
},
resolve: {
extensions: [".ts", ".tsx", ".js", ".json"],
plugins: [new TsconfigPathsPlugin({ configFile: "./tsconfig.json" })],
},
devtool: arg.mode === "development" ? "inline-source-map" : false,
cache: {
type: "filesystem",
buildDependencies: {
config: [__filename],
},
},
optimization: {
minimizer: [
new TerserPlugin({
extractComments: false,
}),
],
},
};
};まずビルドを通したいため、設定画面で保存を押すと{config:pluginID}をsetConfigし、レコード追加画面のヘッダーにpluginIDを表示するだけのReactファイルを作成します。
import React from "react";
import { createRoot } from "react-dom/client";

import App from "./App";

(async (PLUGIN_ID) => {
  createRoot(document.getElementById("config")!).render(
    <App pluginId={PLUGIN_ID as string} />,
  );
})(kintone.$PLUGIN_ID);import React from "react";
interface AppProps {
pluginId: string;
}
const App: React.FC<AppProps> = ({ pluginId }) => {
const handleSubmit = () => {
const configSetting = { config: pluginId };
kintone.plugin.app.setConfig(
{ config: JSON.stringify(configSetting) },
function () {
alert("設定が保存されました。");
window.location.href = "../../flow?app=" + kintone.app.getId();
},
);
};
return (
<div>
<p>Plugin ID: {pluginId}</p>
<button onClick={handleSubmit}>設定を保存</button>
</div>
);
};
export default App;import React from "react";
import { createRoot } from "react-dom/client";
((PLUGIN_ID) => {
kintone.events.on(
["app.record.create.show", "app.record.edit.show"],
(event) => {
const headerMenuSpace = kintone.app.record.getHeaderMenuSpaceElement();
if (!headerMenuSpace) {
return event;
}
const root = createRoot(headerMenuSpace);
root.render(
<div>
<h1>Hello, World!</h1>
<p>Plugin ID: {PLUGIN_ID}</p>
</div>
);
return event;
}
);
})(kintone.$PLUGIN_ID); "desktop": {
"js": [
"js/Mermaid-on-kintone-desktop.js"
], "config": {
"js": [
"js/Mermaid-on-kintone-config.js"
], "required_params": [
"config"
]ここまできたら npm run buildでビルドして、プラグインをアップロードして動作確認します。ディレクトリ構造を正しくしないとビルドが通らないので詳細はGitHubを参照してください。
3. RJSFで設定画面を作る
ここからsrc/ts/config/App.tsxを変更していきます。
まずはライブラリのimportはこんな感じです。
import React, { useEffect, useState } from "react";

import Form from "@rjsf/mui";
import validator from "@rjsf/validator-ajv8";

import { CacheAPI } from "../common/util/CacheAPI";

import type { IChangeEvent } from "@rjsf/core";
import type { RJSFSchema } from "@rjsf/utils";
import type { JSONSchema7 } from "json-schema";
今回は、mermaid記法が入力される文字列複数行フィールドと、図を表示するスペースフィールドを設定するフォーム画面を作成したいです。
そのため、JSON schemaは以下のようにします
const baseSchema: RJSFSchema = {
  title: "プラグインの設定",
  type: "object",
  properties: {
    settings: {
      type: "array",
      title: "設定",
      items: {
        type: "object",
        properties: {
          inputField: {
            type: "string",
            title: "入力フィールド",
            oneOf: [],
          },
          displaySpace: {
            type: "string",
            title: "表示スペース",
            oneOf: [],
          },
        },
      },
    },
  },
};
複数設定できるようにsettingsのtypeをarrayにしています。各設定はinputFieldとdisplaySpaceのセットで、各々ドロップダウンで選択できるようにoneOfオプションをつけています。そしてinputFieldとdisplaySpaceの選択肢はAPIにより非同期で取得してきます。
const App: React.FC<AppProps> = ({ pluginId, cacheAPI }) => {
  const [inputFieldOptions, setInputFieldOptions] = useState<any>([]);
  const [displaySpaceOptions, setDisplaySpaceOptions] = useState<any>([]);
  const [formData, setFormData] = useState<any>({});
  const appId = kintone.app.getId();

  useEffect(() => {
    const fetchApps = async () => {
      try {
        const fields = await cacheAPI.getFields(appId);
        const filteredFieldsOptions = // レスポンスを加工
        setInputFieldOptions(filteredFieldsOptions);

        const layout = await cacheAPI.getFormLayout(appId);
        const displaySpaceOption = // レスポンスを加工
        setDisplaySpaceOptions(displaySpaceOption);

        const responseConfig = kintone.plugin.app.getConfig(pluginId);
        if (responseConfig.config) {
          const parsedConfig = JSON.parse(responseConfig.config);
          setFormData(parsedConfig.config);
        }
      } catch (error) {
        console.error("Failed to fetch apps:", error);
      }
    };

    fetchApps();
  }, [pluginId, cacheAPI]);
さらに、非同期処理によるフォームの動的なレンダリング対応は以下のようになります。
  const dynamicSchema = {
    ...baseSchema,
    properties: {
      ...baseSchema.properties,
      settings: {
        ...(typeof baseSchema.properties?.settings === "object" &&
        baseSchema.properties.settings !== null
          ? (baseSchema.properties.settings as JSONSchema7)
          : {}),
        items: {
          type: "object",
          properties: {
            ...(typeof baseSchema.properties?.settings === "object" &&
            baseSchema.properties.settings.items !== null &&
            (baseSchema.properties.settings.items as JSONSchema7).properties
              ? (baseSchema.properties.settings.items as JSONSchema7).properties
              : {}),
            inputField: {
              type: "string",
              oneOf: inputFieldOptions,
            },
            displaySpace: {
              type: "string",
              oneOf: displaySpaceOptions,
            },
          },
        },
      },
    },
  };
実装の詳細は省いているのでGitHubよりご確認ください。
これにより以下のようにフォームが作成されます
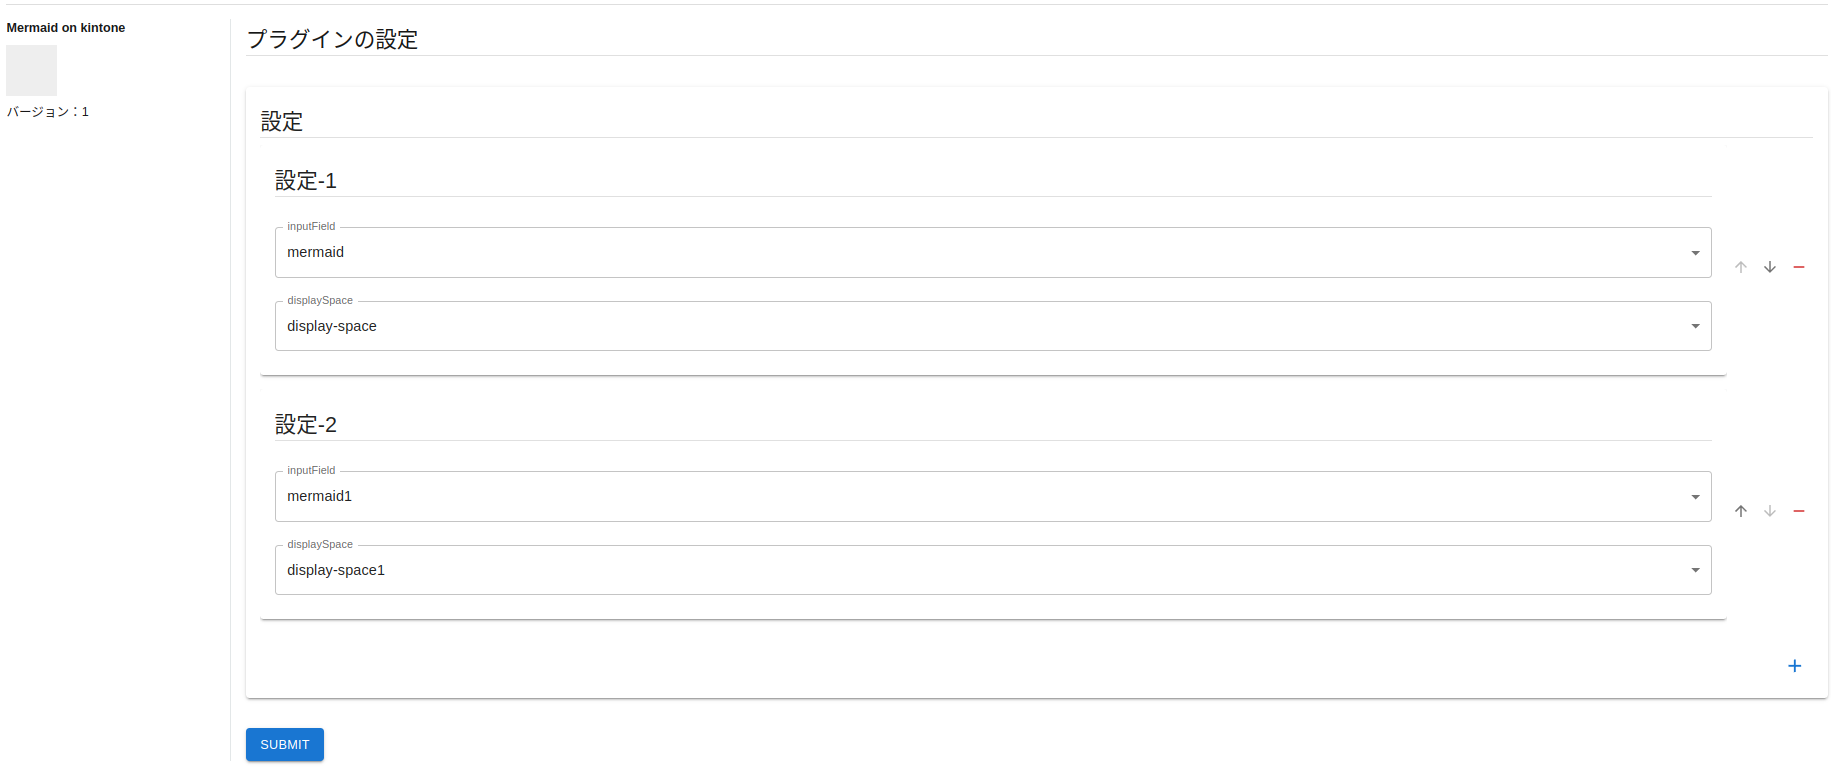
以上、初歩的な実装の完成です!
JSON schemaを書くだけでフォームが作成されるのはかなり便利です。特に設定を複数するための+ーボタンと、その動作を勝手に作ってくれるのはかなり助かります。
ただ、便利とはいえAPIで取得した配列をoptionにセットする処理などは多少の工夫がいります。今回は画面ロード時の非同期処理のみでしたが、実際は アプリを選択→選択されたアプリのフィールド一覧を選択できるようにする などのユースケースへの対応が考えられます。
また、スタイルのカスタマイズもWidgetとTemplate、Fieldなどを用いてできますが、今回は深堀しません。
最後に
というわけでRJSFを使ってkintoneプラグインの設定画面を作成してみました。
この記事で伝えたいことの本質はJSON Schemaからフォームが自動生成できればいいので、Reactである必要はないです。しかし、RJSF以外でこういったことができるライブラリがまだあんまりないといった印象です。Vue.jsとかVanilla JSでJSON Schemaからフォームを自動生成するライブラリを作るとかも面白そうですね。